18 May 2023

Kings of War Salamander army finished!

Well, as finished as armies ever get before inevitably being reinforced as shiny toys insist on being purchased!

The last units consist of a rhinosaur horde (who doesn’t love large lizardmen riding even larger rhino lizards?) a rhinosaur hero (taken from the horde who are now five strong), a Lekelidon (the more traditional looking black lizard) and a Gekkotah Skylord (the little lizard on the back of the flaming bird)

Pretty pleased to have got these done as they represent a 2,000 point list for the game. No idea if they’re any good, but they’re what came with my original second hand purchase, so I’m happy enough with that!

I got these in mid December and had six weeks out for building work at the house, so four odd months to get an army finished is something I’m pleased with and I wish I could do that more often!

Now I just need to resist the urge to buy more figures as a congratulations to myself for my work on reducing the stuff on the shelves of holding.


30 Apr 2023

The More Unusual Elements of the Salamander army

Following on from the rank and file, I’ve now finished a bunch of the more unusual units for the salamanders army for Kings of War. Once again, I’ve multibased to make them easy to set up and use. Thank goodness for the MDF sellers on eBay who helpfully sell most base sizes that I needed.

This unit are fire elementals. The salamander army seems synonymous with fire and the units completed here are mostly fire and flame related.


These chaps were pretty quick to paint up as I decided to be pretty abstract with the flames and use a mix of red, orange and yellow and some black to show soot and smoke. As larger based (40mm square) model, there are three of these to a regiment.

Next up are the scorch wings, which appear to be animated rocks in the shape of birds who exude flames!


Don’t ask how they fly, I guess it’s magic.

Now for the biggest flame based model in the army - the phoenix!


This is an absolutely beautiful model and, along with the other models above, Mantic had done a fantastic job on the resin figures for this army. It’s a bit of a beast, that’s a normal 28mm model in the last photo.

It’s quite the chunk of resin and was great fun to paint.

This next unit consists of Tyrants. They’re bigger lizard creatures and also need three to a base for a regiment and 6 for a horde….. but I’ll admit to have cheated and broken the 75% rule for this lot. I’ve put two one one base and one on another to make a horde sized base.


They’re lovely resin figures once again and I was tempted to get more, but I decided to cheat as I want to get the army done and I wasn’t filled with excitement about painting another set of them. I may come back and add to the unit later, but for now they’ll certainly do.

I then moved onto the characters for the army. These two are a mage priest (who throws fireballs that get more potent if he’s standing by the flame elements of the army) and a war leader who can be one of a couple of options.


Really pleased with how these have gone so far and I just need to stay focussed and finish the last few units and I’ll have a 2,000 point army all painted and ready to play.

14 Apr 2023

Rank and File for the Salamanders Kings of War army

I tend to find that I can sometimes be laser focussed when hobbying and sometimes flit around doing lots of projects or units without finishing anything! It was very much like that with the salamanders as I got my colour scheme for the main units and so was able to smash out a lot of salamanders in pretty good time….. but then I left the basing and a few models to finish each unit and so had virtually the whole army on the go at the same time!

Whilst this can be frustrating (even for me as I do it!) and messy (with lots of half finished things laying around the hobby room) the benefit of this approach is that every now and again lots of things get finished at the same time. This happened here and so I herewith present, the rank and file salamanders.


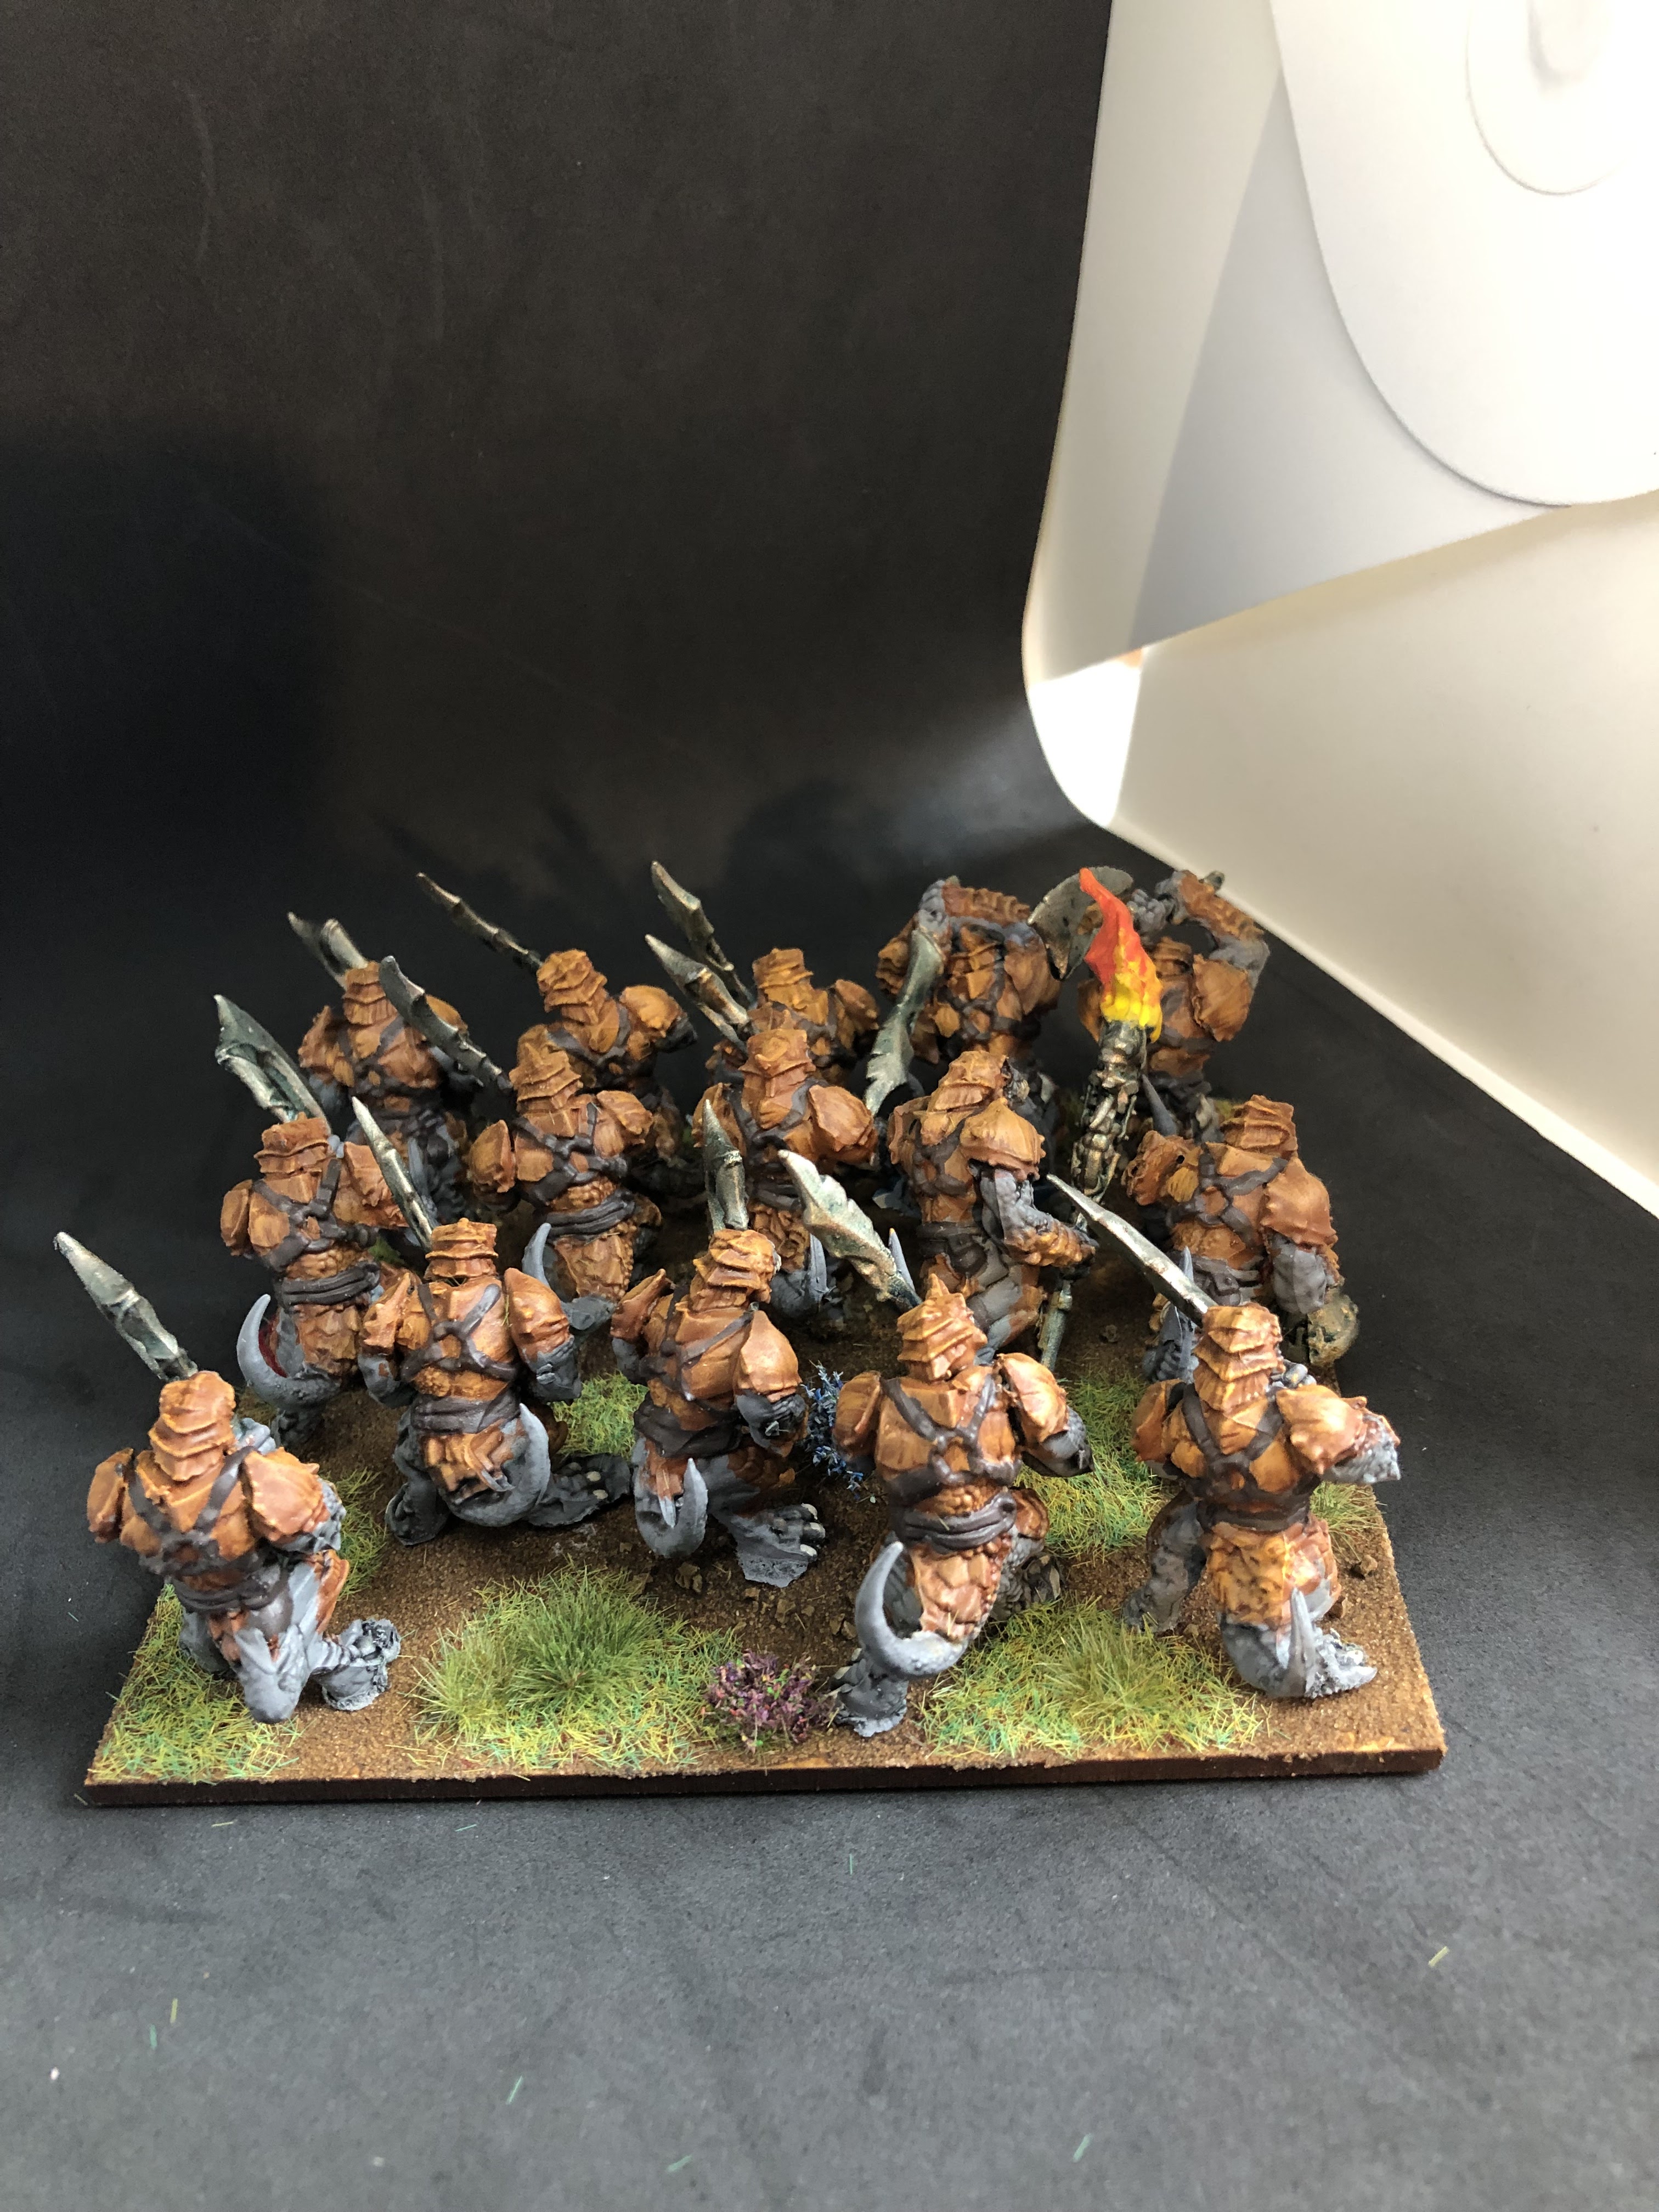
This unit counts as a regiment in game and I armed with swords and shields. I decided to multi-base them as it means I can be set up for a game very quickly. Whilst it means that I can’t use the figures in other games, I think the trade off is well worth it as I’d rather use figures properly in one game than have them more flexible for other games that I’ll likely never play in reality.

In Kings of War, you’re encouraged to use 20 individual figures in a regiment, but they suggest a minimum of 75% of that where possible as it looks good. These salamander figures are pretty bulky and so I went with 15 and as you’ll see from this picture of the next unit, it’s not like I had much spare space!

This next unit is the same as the first, but is armed with clubs and axes. The figures were all stuck together already when I picked them up, but I was fortunate as I had enough of each armament to split them like this.


Broadly speaking, Kings of War allows you to use Troops (10 infantry), regiments (20 infantry) or hordes (40 infantry) with each base size being double the previous one. I discovered that I can put these two regiments together to make a horde, but only one way around - sometimes it’s better to be lucky than good as I didn’t plan this whilst putting them on their bases!

The last main unit is armed with double handed weapons. These lads trade away some armour for additional hitting power.


The final unit that I completed is the ceremonial guard. These are elite warriors armed with spears, which are good against cavalry. I’ll admit to having painted them because they were in the bundle army that I bought rather than any tactical acumen, but they do look cool. They use the same base bodies as the main units, but have resin upgrades for arms and heads.


Again I went for a lighter model count than the maximum but there was again very little space left on the base!

Next up is the more unusual units for the army and to see if I can keep my focus enough to get this army done in its entirety before I start working on a different project……

9 Mar 2023

The Salamander Army Takes Shape

 I had to have a bit of a break whilst we had our kitchen redone - my painting room was he room chosen to be “the studio flat that we all lived in whilst the work was being done, so the whole room was just full of stuff and meant all of my paints had to be packed away…..

But that’s all done now and so I got out the salamanders again as the striping and starting painting had happened before all of that.

Anyway, I settled on a nice and simple paint scheme as I have waaaaaaay too many figures and scenery waiting for some attention. So decided that I wanted to get these done and on the table quickly. First up, a grey primer for the salamander warriors and onto painting sticks as I was going to multibase them


The scheme relied on contrast paints, washes and a bit of touching up

Pleased that I was getting through the rank and file nicely, I started on the fun, flamy elements of the army. First, a red undercoat for them

A Phoenix, three flame elementals, three flaming bird thingies (not sure that’s their official title) and a bigger flaming bird thingy for a hero.

Once again, I was keen to get these done quickly, plus (and most importantly) I’m rubbish at actually doing flames on models, and so decided to go a little more abstract on the flames, as shown in progress pics below


Steady progress being made for once and next up is some more painting and onto the basing!


7 Mar 2023

A New Project - Kings of War Salamander army

Well, it’s been a very long time since any of us posted anything here. The usual reasons posted on any hobby blog which hasn’t been updated for a while apply, but also a more personal and sadder one. One of our stalwart gaming group passed away at the start of 2020 and frankly he was the one who was keeping the blog going.  We all took a bit of a knock from that and still miss him terribly, but I’ve now decided that I should get back on the blog, partly as paying my respects to Nat as he’d have wanted us to get painting (he was always, quite rightly, telling us to paint and play instead of buying more things!) and as a diary of what I’ve done.

So, what am I starting with? Why a complete army for a game that I’ve never played of course!

Kings of War looks like a very good game. I’ve become disillusioned with age of sigmar and 40K for a number of reasons, with the main one being that I can’t fit a game into an evening anymore. But I do really like the sci fi and fantasy genres so I’m moving over to trying the games produced by other companies, including the Mantic stable, which look great and seemed designed to fit into an evening’s play.

Idly scrolling through eBay (and yes, I do count searching specifically for “Kings of War army” as “idly scrolling”!) I happened across a large, but very badly painted salamander army for auction….. I stalked it for a few days, telling myself that I already had too much stuff and didn’t need it…… and then obviously pounced at the end when my willpower crumbled away in seconds. But it was a bargain!

Here are some pictures of the unboxed win


As I’d hoped, it just needed a bit of work, but nothing looked unsalvageable. I decided that I’d paint strip the bigger, posher resin green models for the most part (I was pleasantly surprised to see that the resin stuff produced by Mantic is lovely these days, easily the match of other producers), but that I’d just overspray the rank and file salamanders with undercoat and go from there. I reasoned that the larger models would be more visible whereas the rank and file would merge together more. And it would have driven me a bit bonkers having to paint strip everything.


Into the bio strip….


Happy with how things were going, I started painting, which I’ll update next time.


13 Sept 2019

Random distractions


My efforts have been somewhat lacking in direction following the completion of the Mustafar set so I’ve been following my muse and just picking up little bits that took my fancy.


After finishing the scrap cars for my pulp city scenery collection, I thought I might do some of the other little incidental bits as some of them have been hanging around for years. First off were some generic bits including tables, chairs & beds. Quick and easy!


I got a TTcombat arcade a couple of years ago. I’ve not painted the building yet but the idea of painting an arcade machine tickled me.


Random build. WWII sentry post.


Colours was at the weekend and this mdf kit caught my eye. Rickety and characterful. I’m looking forward to painting it!


All this contemporary scenery stuff got my juices following for a bit of superhero gaming so we broke out the town for a game.


YTD 308

4 Sept 2019

Scrapyard additions

I've not done any work on my Pulp City scenery for ages despite having collected and painted loads of it. I still don't actually consider it ready as I've not added any vehicles.

I three years ago (gulp!) I brought two 28mm resin cars to add to this set. I'd deliberately not painted them yet as I'd intended to try and do some cheap moulding from them to make some car parts to add to the scrapyard part of my scenery collection. Of course that was the plan but I'd not gotten around to it.

I ended up having a free hour at the weekend and it struck me that it could be a fun and slightly messy thing to do with the kids...so out came the tin foil and plaster to give it a crack.


I wrapped one side of the cars in foil, gently starting with the roof and carefully pressing it down around the body of the vehicles. There was no way to avoid creases but I wasn't too worried as they are meant to be junk! The surplus foil on the sheet was rolled round to add some support to the mould for when the plaster was added.


I extracted the originals fairly carefully then gave the foil a poke and a prod to deform it. Then the plaster was poured and left for an hour. I wasn't sure at this stage but hoped that they would come out okay.

I wanted to protect the edges of the plaster at the base as I suspected it would chip easily there. I thought the best way would be to mount them on some plastic basing material which also meant I could use the sand to help them look like they were buried slightly.

Just paint after that to finish them off. Simply bit of weathering and they were all sorted.

Now I just need to paint the proper vehicles!

YTD 287

TTFN